
Waiter There’s a Fly Press in My Soup Part II, Punching Saw Teeth
April 13, 2010We got off to a fast start in our first installment. In case you missed it, we had videos of Japanese saw smiths, we gunned down a burglar with a Foley retoother, and we dusted the cobwebs off Charles Holtzapffel. A veritable smorgasbord of sawmaking curiosities. I’m going to assume you’ve read that installment and won’t repeat much from it. One thing I will repeat, though, is Charles Holtzapffel’s description of a toothing gauge. It will be helpful to have it near at hand. He writes:
This description was the only actual description of any kind that I had to work from. But of course I also had in mind what I needed a toothing gauge to do—so ultimately what I did was work backwards from what I needed, carefully considering Holtzapffel’s description as I did so. Here is what I came up with.
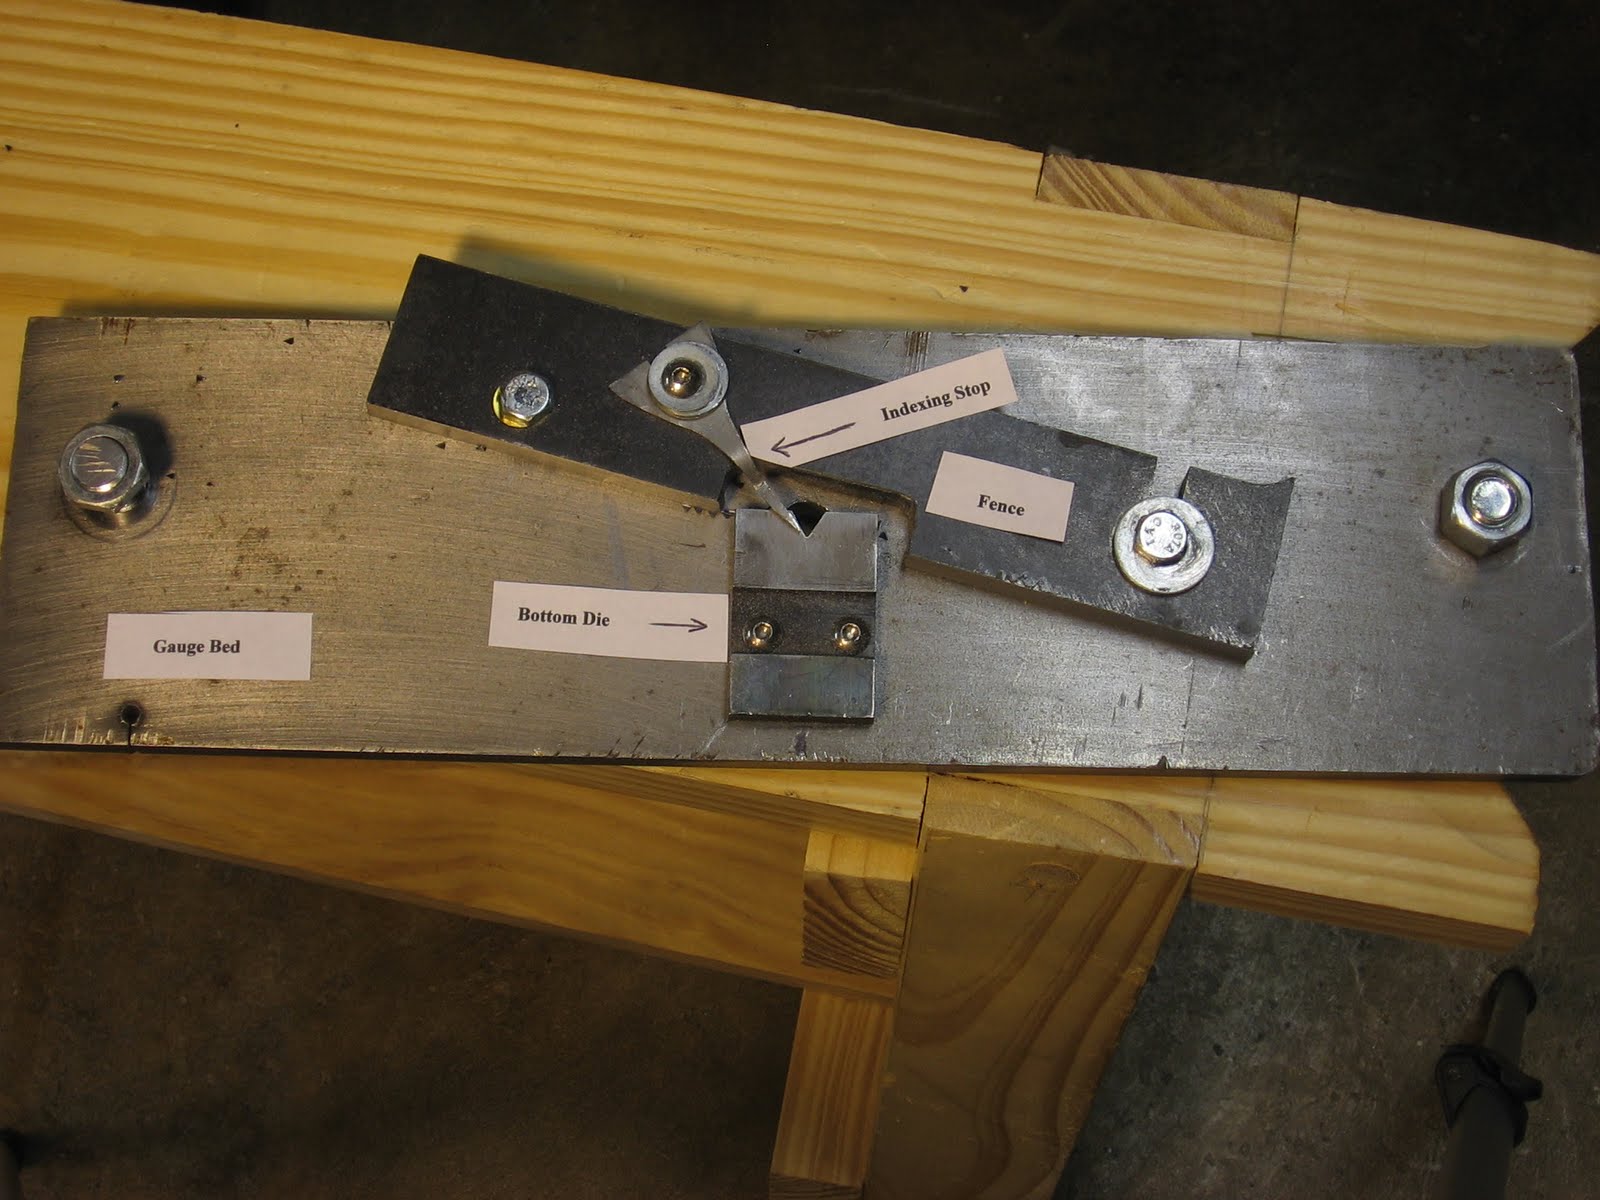
This first shot shows the gauge from above with some of the parts labeled. The second shot shows the gauge installed on the press.

The whole thing sits on the fly press table and is fixed to it by the bolts that pierce either end of the gauge bed. The heads of the bolts fit into T-slots in the fly press table. You’ll notice that the lefthand nut that fixes the gauge is about half the height of the one on the right. That is because I feed the saw plates from right to left, so the plates pass over that lefthand nut; it initially did stand up higher and got in the way, so I cut it down.
Probably the biggest thing you’ll notice is that my gauge has a solid fence and no studs. Holtzapffel’s description of two studs acting as a fence seemed less effective a solution than simply having a solid fence. For instance, two studs that lead the blade to the cutter would probably be placed a few inches apart in order to be an effective fence—but then once the blade was advanced to a certain point, it would no longer be supported by both studs. A solid fence, by contrast, never loses contact with the blade, and can even cross over and support the blade on both sides of the cutter.
The fence is adjustable not only for rake angle but also for depth of cut. What’s more, the same cutter can be used to cut all sizes of teeth. The size of the teeth is determined by how closely and shallowly the teeth are spaced. For the smallest teeth the old makers would have used a punch that punched several or so teeth at a time. I haven’t gotten around to making one of those yet but plan to.

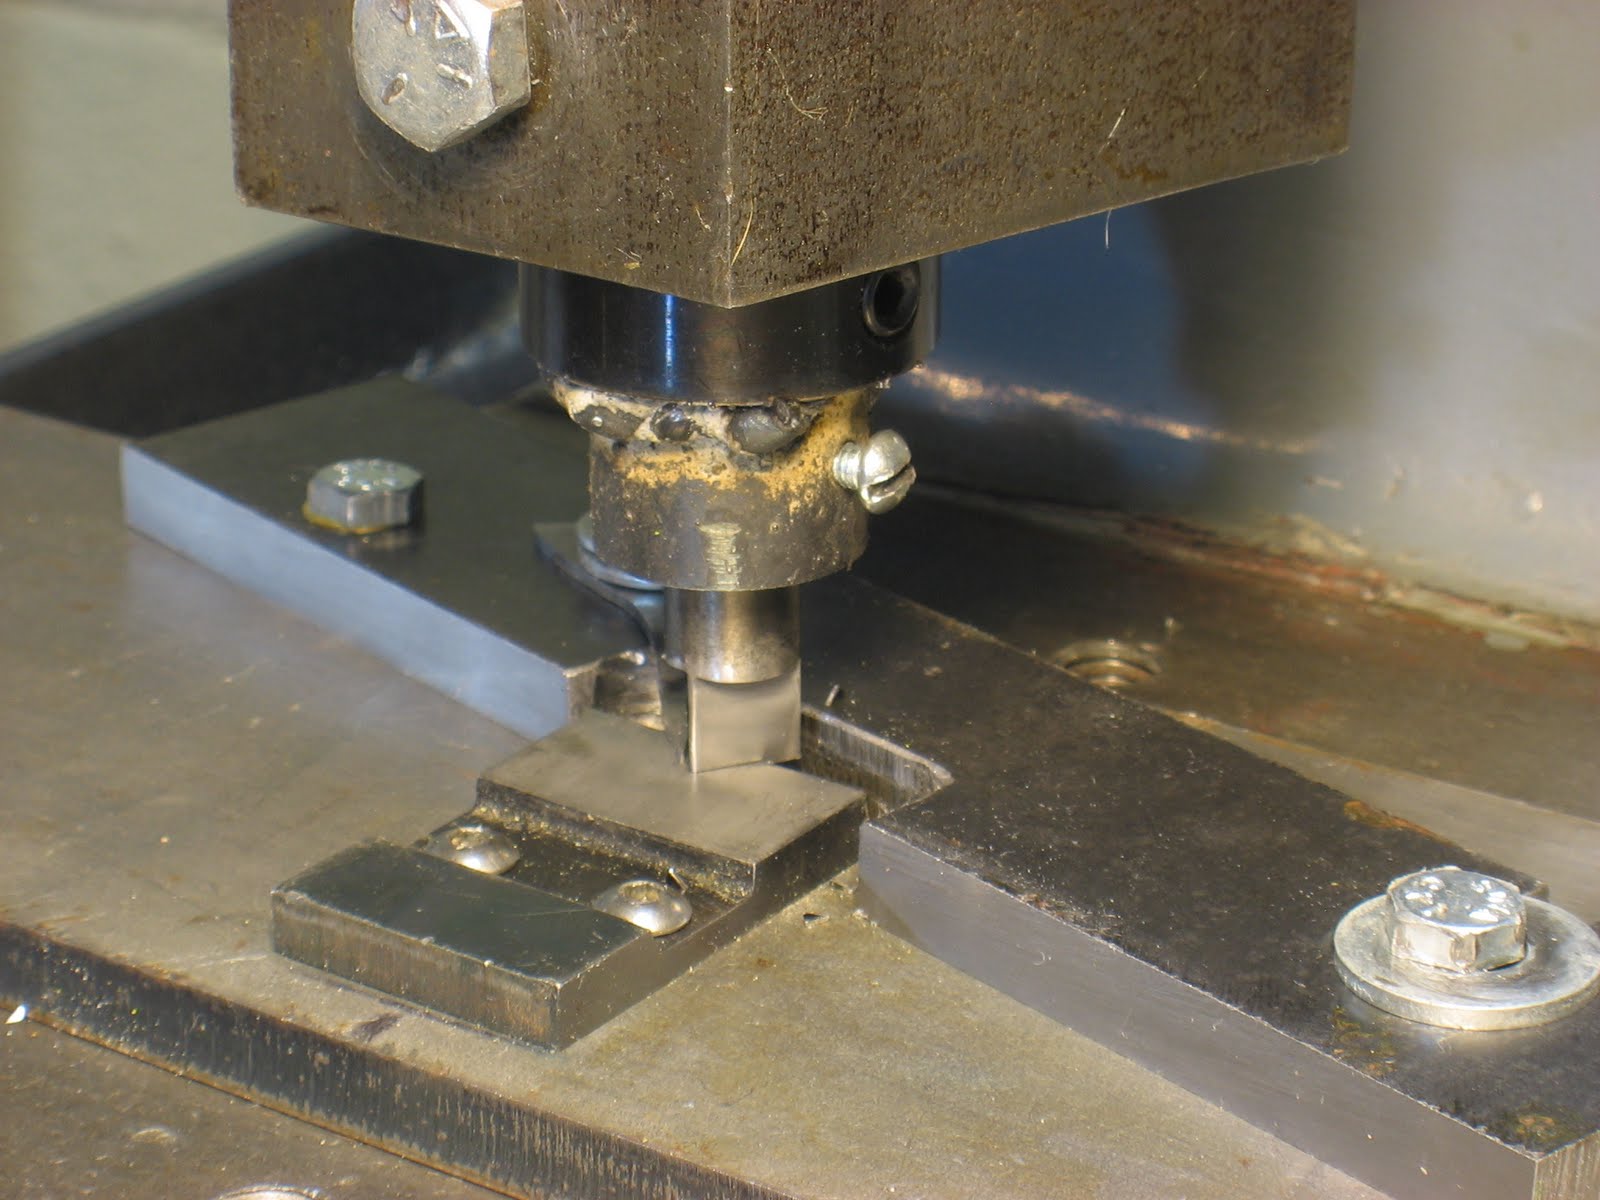
The punch I did make is made from W1 tool steel. The lower die is made from O1 tool steel. The bottom die is held in place with a pair of recessed screws; they are recessed so that the saw plates can pass over them without the heads of the screws interfering. The W1 punch was filed to shape to fit the lower die and is held in an auxiliary tooling holder that fits into the fly press ram. The die and punch are made from different types of tool steel just because those were what I had on hand. The O1 is more ideal for this type of work, but the W1 works fine.
The teeth are spaced using a little indexing stop that I made from scrap steel. It is adjustable both from side to side and from front to back.


It works like the one Holtzapffel describes–it registers against the last tooth punched. That registration, combined with control of the rake and depth, is what produces good teeth. All three variables have to be regulated–if you adjust spacing without adjusting depth of cut, for instance, you wind up with all sorts of odd permutations, some of which result in the punch just nicking the blade. Like this:

Now that you see how the gauge goes together, let me show you how I use it. The first thing to do is to register the punch with the lower die. To do that I loosen the bolts that secure the gauge bed as well as the set screw that hold the punch in the ram. I move everything around until it meshes just right then gently snug it up. The punch and die are both made with relief angles so that they make contact just at the point where they shear the saw platel. Then their surfaces retreat just a bit. The punch and die either needed relief like that, or they needed to be perfectly vertical, and it was simply easier to give them a tiny amount of relief. If they sloped in the other direction they would spread apart as they engaged, and as the punch was raised you’d see that the cutting edges no longer meshed.
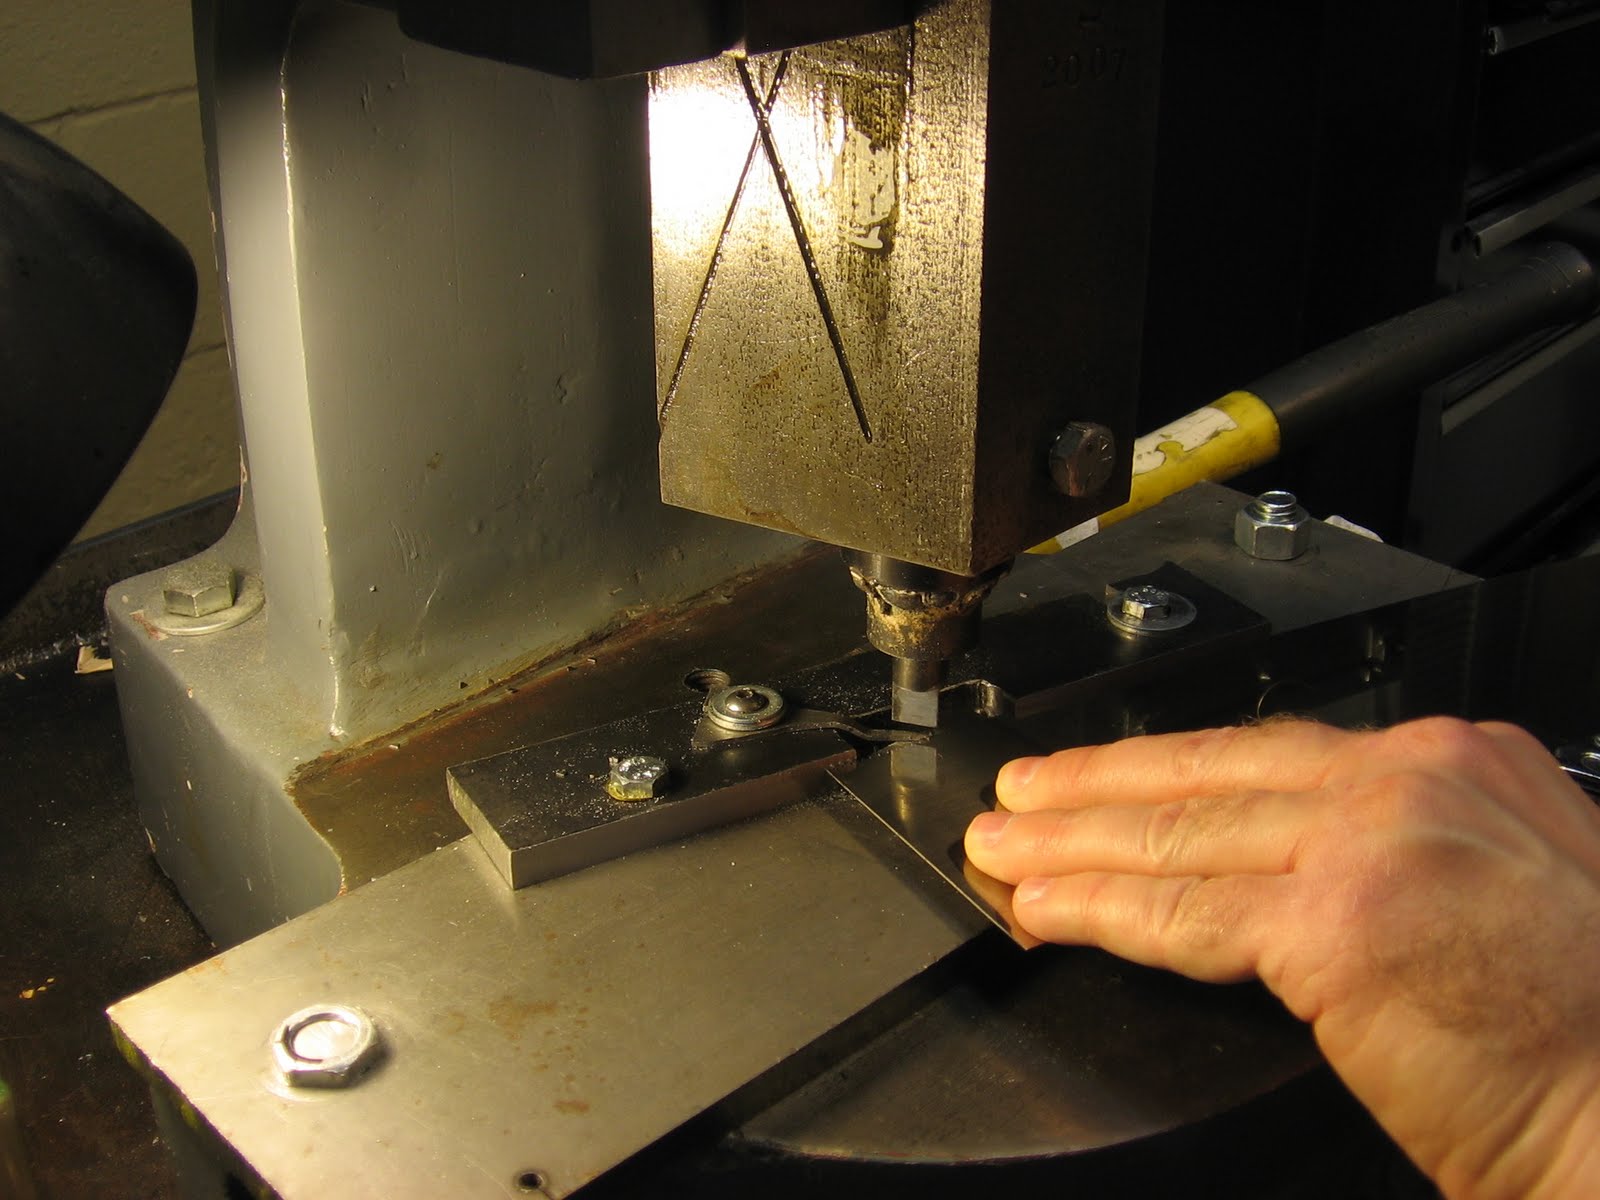
The next thing to do is to set up the fence and indexing stop. To do that I use a piece of saw plate that already has the desired tooth configuration–I place it against the fence and place the cutter in one of the gullets. I adjust the depth and angle of the fence so that the cutter fits perfectly in the gullet. Then I gently snug down the bolts that hold the fence.

With the plate still in place I move the tip of the indexing stop into place against the tooth beside the cutter. Basically I am aligning everything just as if it had punched the very plate I am using for alignment purposes.
 I snug up the screw that holds the indexing stop, and I’m ready to go.
The pictures of actually using the press don’t look much different really than the pictures of setting it up. Only now the cutter is going up and down, and I’m not fooling around with any wrenches. Here’s a picture of just starting out punching a saw plate.
Here is the same plate much farther along.
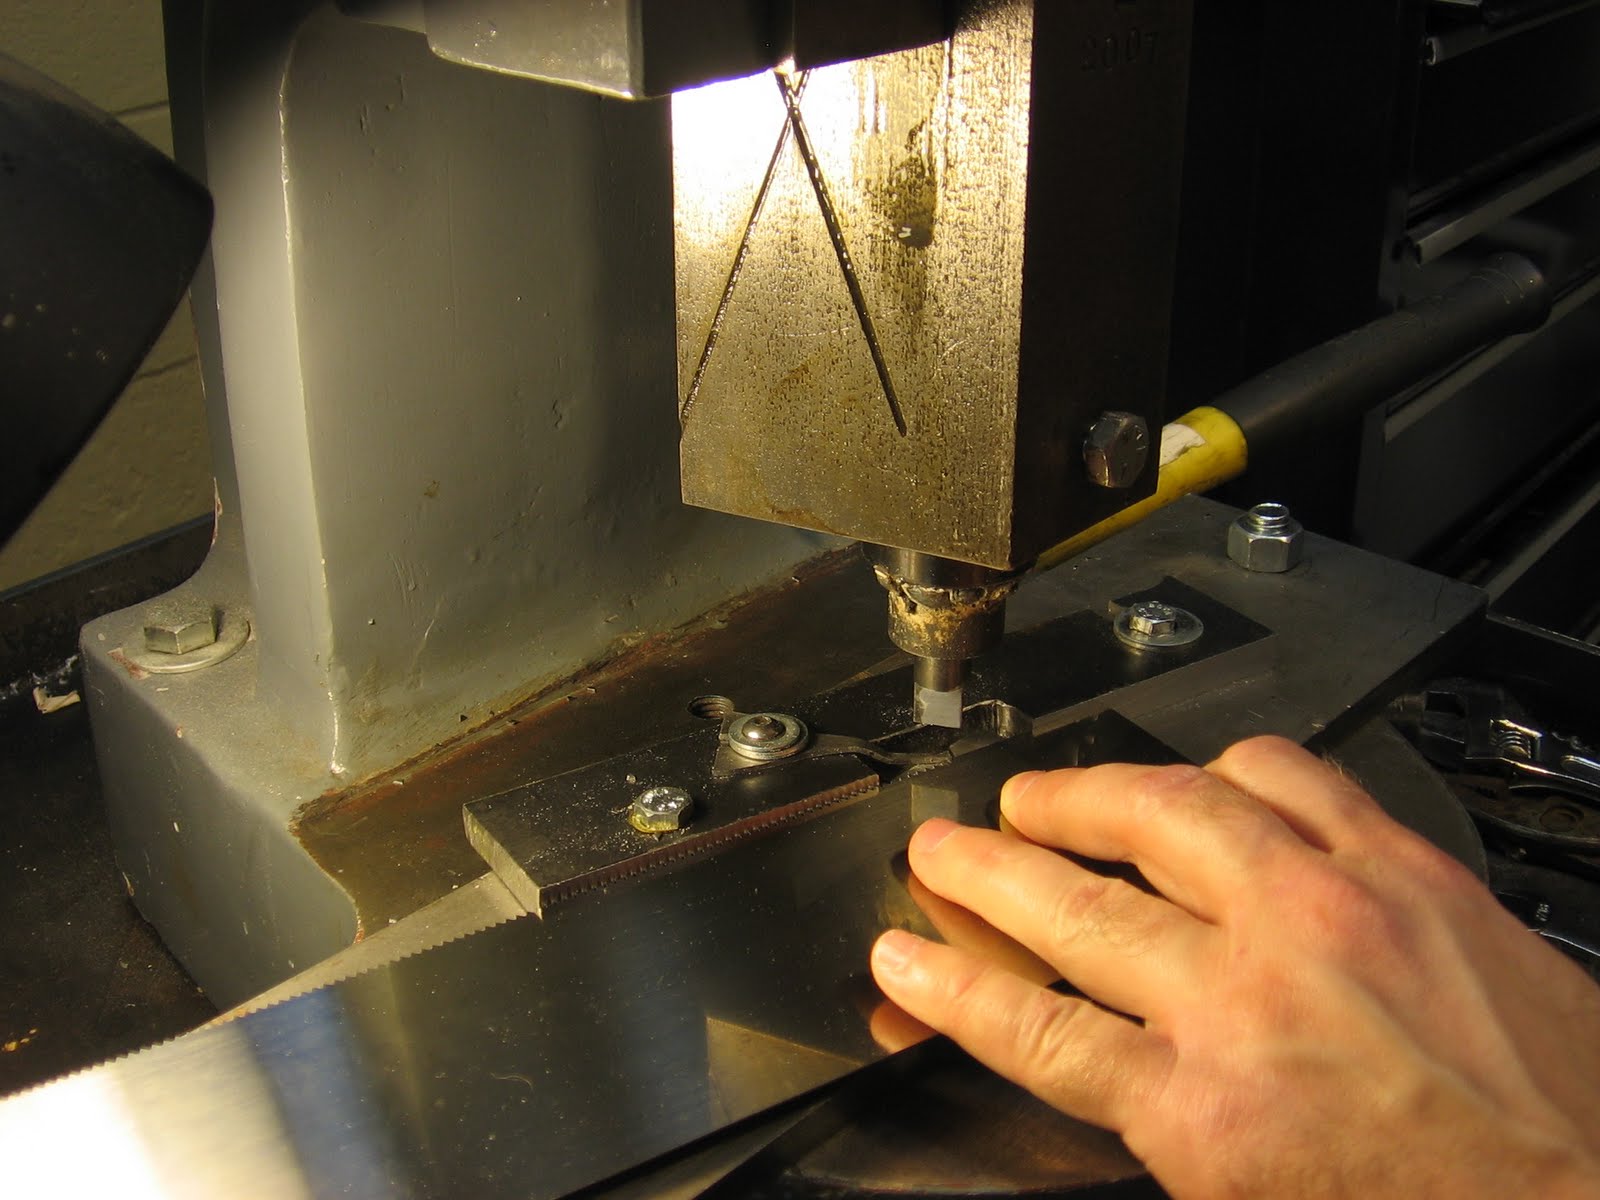 And below is what the plate looks like with the teeth nearly, but not quite, finished.

So that’s about it. I’ve been very pleased with how the toothing gauge has performed. For me this method strikes just the right balance between thoughtfulness and expedience and seems to fit nicely with the other processes involved in making my saws. At some point down the road I will experiment with a second gauge that utilizes the two studs for a fence like the one that Holtzapffel described. I still feel that tugging at me. But for starters I wanted something that I knew would work and that I could rely on right away in my own work. Thanks for reading.

Hi Andrew, It's great to see the jig set up and working so well. You may have just punched the first saw teeth for many decades, maybe even longer! I follow your logic on the fence, but I am also intrigued by Holtzapffel's description. I've just been sketching away on the back on this morning's post, and one arrangement that looks viable would be to put the two studs on the near side of the blade, between you and the punch. One would be around 2-3 pitches to the downstream of the punch, and one just one pitch upstream. It would leave the first portion of blade with no teeth, and would mean that you have to lift the blade into position for every tooth, but you could then punch to the heel of the blade, and wouldn't have to hold the blade in place whilst operating the press. The first picture in the last post shows the blade as described and it looks like the setters fingers are under the blade, lifting it into position. The only problem with the theory is that the spacing stud couldn't be positioned until after the first tooth had been cut. Sorry if you've already thought of this; I just can't resist a puzzle. I think you're fence is better for your needs though. It's adjustable, universal and much quicker for fine set teeth than the set up that I've described. John
Hi John,Thanks for the comment and thoughts. This stuff is sure interesting to think about isn't it. I can't resist a puzzle either. I did indeed consider something along the lines of what you suggest–I thought about a number of configurations. The one we're talking about here, I thought it was unlikely for three reasons. First and foremost, using a fence of any type on that side of the blade would be problematic for punching teeth on any blade that was tapered in height. The depth of cut would rise or fall as you moved the blade along, depending on whether you fed it toe or heel first. Second, the old makers were supposed to have been able to tooth saws pretty fast, so I doubt they had an arrangement where they had to lift the saw up and set it down for every tooth. Then lastly, some saw blades can be rather tall, which would necessitate having a fence 7-8" from the cutter, which would in turn necessitate the gauge itself having a rather large table. Which seems kind of unlikely. The tables of the fly presses themselves aren't that big even, so such a gauge table would hang off the front of that.One further consideration is that if you used the back of the saw as registration for punching the teeth, the back of the blade would have to be the same shape as the tooth line.So I feel pretty sure the fence was not on the near side of the blade. I'll leave another comment later tonight or tomorrow with more ramblings about the Holtzapffel design. Thanks again for the comment John.Andrew
Hi Andrew,Really enjoyed your pic/tutorial. How much do you have to turn the wheel to make the punch travel the distance needed to punch a tooth?Do you get any warpage from punching a full length plate? I'm sure by filing your die and punch with some relief, the warpage is reduced or eliminated. Tapering the bottom of the punch from the point to back will help draw the plate back against the fence and will make the punch cut the metal with much less downward pressure. This would be most effective on the bigger teeth. You probably have already thought of that.I'm wondering if an arbor press could be used for punching the smaller backsaw teeth. The only reason I'm wondering about it is because I have two of them. I use one of them for cracking walnuts.Now all we need to do is design a mechanism to advance the plate automatically. Just kidding..*grin*Catchalater,Marv
Here are my ramblings about the Holtzapffel design for John and anyone else who was interested. I think the way it works is sort of like this–bearing in mind of course these are just ideas. I think the two studs likely served as a fence on the far side of the blade and fit into holes in the plate that served as the gauge bed. I think the one peg nearest the cutter was probably pretty close to it and would have been fixed, while the farther one had different holes it could be placed in. There are different ways to adjust for depth of cut–you can make the fence itself adjustable like I did, or you can make the bottom die adjustable and leave the stud closest to the cutter fixed, in which case you could move the gauge and die around to adjust the depth of cut. An engraving from a book called "A Day at the Factory" seems to support this–it isn't perfectly clear but seems to show a bottom die held in place by a fixture that has four screws that are used to adjust its position. Still no sign of studs or an indexing stop, though.It's tempting to think that maybe they used a number of simple dedicated gauges, each one dedicated to a single ppi, but it is clear from Holtzapffel's description that the gauge he's talking about can accommodate different tooth counts and therefore would have to be adjustable in some way for depth of cut. What's more, the Beardshaw inventory from 1823 shows just one toothing gauge, not more than one.Here's a bit more discussion on the main problem posed by the two stud fence: how to get the saw plate through once it has lost the support of the far stud– I see a couple of ways through it–first, it simply may be that a practiced hand and eye is able to use the one remaining stud and the indexing gauge against the side of the tooth to carry the remainder of the saw plate successfully through the punch. I'm a little doubtful of this, as it takes just very small errors to produce major problems with the teeth. This method would be just a little better than totally freehanding it. But maybe.Or,The indexing stop on the Holtzapffel design might have been shaped so that it not only hit the side of the tooth, but bottomed out in the gullet—which would have made it function like an extra piece of fencing. This of course wouldn't be that great of a fence, but it might have provided that extra bit of assurance that, combined with a practiced hand and eye, could get the rest of the plate through. It's possible.And finally it's always possible that Holtzapffel's description isn't complete somehow or isn't perfectly accurate. It's a few sentences in a three volume set hundreds and hundreds of pages long. And it wouldn't be the first thing I've come across in Holtzapffel that wasn't perfectly delineated. So, … who knows.I don't have all of the answers–just ideas. I haven't gotten around to making a gauge with studs to see what might and might not be feasible. I plan to someday, but right now I'm too busy making saws!
Marv,Thanks for stopping by.I get virtually no distortion with this punch and die. The way you described filing the punch, that's how I do it.Cracking walnuts with your arbor press, why doesn't that surprise me! What you need is a coffee table arbor press so you can crack nuts while you watch the game.To answer your questions about the wheel movement and the arbor press–the wheel does not move all that much, but it has incredible inertia. An arbor press could possibly compensate for some of that by maximizing its leverage. If you could punch a hole in a saw plate with an arbor press then you could probably punch teeth with one. see you,Andrew